This blog was created five years ago when I was nine. Back then, there was no Codecademy or easy online resource to learn to code. That is probably why I created this blog. Now Codecademy exists and it has become increasingly easier. But there is still languages that Codecademy fails to cover.
All of that is so little in what staying Tom means. So what happened to this blog and where is it going? I've thought about reinventing this blog for some time now. I think that now would be the best time to do this. I stopped this blog around the time when I stopped home schooling. I just stopped caring to update it. I want to change that reality though.
Since then, I have skipped a grade, written two books, found a passion in music, and became the lead programmer for my high-school FRC robotics team in ninth grade. This is my second year of being the lead programmer in my robotics team. So I have never lost my passion in programming. Instead I have gained new passions.
So I will be updating this blog. This will be the start of something new. In this blog I will discuss everything that I enjoy. This will include science, teaching programming, adventures in programming, adventures in FRC, and my favorite subject, gaming. This will be my blog. This will be all about me and my passions. This is no longer a blog about just programming, this will be a blog about me and what I like to do.
When I originally created this site, I plagiarized it. This was before I knew what plagiarism was and so now I am sorry that I have done that. I plagiarized the book I learned to program python in, Hello World! My other attempts do edumacate you was completely original, but I know that I can do much better in my tutorials and such. I have decided to delete all previous posts prior to this one.
I don't know if this blog will become popular or what will become of it, but I do know that this will be something that I enjoy doing. Now watch that in a couple of years it will become inactive again.
Monday, October 24, 2016
Monday, November 25, 2013
Story time with yours truly
All right, turn to page sixteen in your books. You should see a monkey's ape. Am I saying this right? Tell me I'm saying this right. No? Okay.
Formatting is very important when you are creating a website. You have to make sure you like the formatting, the people who look at your website like your formatting, and that the formatting goes well with what your trying to do. We are going to talk about to day is formatting for website's navigation bar.
A traditional navigation bar is one of these:
We want to use a better one, more like one of these:
Home
Follow
Isn't that neat! I'm actually only using one picture. This one:

As you can see the top one is what it looks like when you do nothing to it. The middle one is where you hover on top of it, and the bottom is the one where you click on it.
Formatting is very important when you are creating a website. You have to make sure you like the formatting, the people who look at your website like your formatting, and that the formatting goes well with what your trying to do. We are going to talk about to day is formatting for website's navigation bar.
A traditional navigation bar is one of these:
We want to use a better one, more like one of these:
Isn't that neat! I'm actually only using one picture. This one:
As you can see the top one is what it looks like when you do nothing to it. The middle one is where you hover on top of it, and the bottom is the one where you click on it.
Monday, May 13, 2013
Leave Me Alone!!!
I am sorry I have not been posting in a while. My family just moved, had a baby, and visited some relatives. So to make up for it, I am going to do Two very special blog posts. This one is about a robot called LEAVE ME ALONE (Video Coming Soon!).
Here is a picture of it:
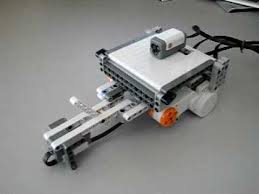
basically what you do is flip a switch, which opens up the box thingy and then the robots hand comes up and turns the switch off. It is actually quite funny. Wait till I make a video and you'll think so to. There has been other videos about the LEAVE ME ALONE bot, but what makes the one that I have special is that I have instructions. I can't wait to show off my video. The only way to earn the instructions are to like, comment, and subscribe. So do all three and you too can build the leave me alone bot (you will need a LEGO Mindstorms 2.0 kit to build it). Thank you for your time and have a good day.
Here is a picture of it:
basically what you do is flip a switch, which opens up the box thingy and then the robots hand comes up and turns the switch off. It is actually quite funny. Wait till I make a video and you'll think so to. There has been other videos about the LEAVE ME ALONE bot, but what makes the one that I have special is that I have instructions. I can't wait to show off my video. The only way to earn the instructions are to like, comment, and subscribe. So do all three and you too can build the leave me alone bot (you will need a LEGO Mindstorms 2.0 kit to build it). Thank you for your time and have a good day.
If you want to challenge me to a game of chess go to www.Chesskid.com and sign up.
Then send a friend request to Stayman
And then challenge me to a game of fast chess or slow chess
Wednesday, April 10, 2013
I can weave the fabric of code!!
Hello, I am ______ ____ and I am here to teach more layout. I now use adobe dreamweaver to punch in my code. So last time I did this:
I have a weird feeling... BABOOM!
This time we're going to do this or something like it(when I said we I mean all of us, I don't want to do it alone):
Well here is the code:
<div class="container_12 clearfix">
<div class="grid_12" id="top">
<h1>
Logo</h1>
<div id="nav">
<ul>
<li><a href="http://www.blogger.com/tom.staynalive.com">Home</a></li>
<li><a href="http://www.blogger.com/tom.staynalive.com">Products</a></li>
<li><a href="http://www.blogger.com/tom.staynalive.com">Services</a></li>
<li><a href="http://www.blogger.com/tom.staynalive.com">About</a></li>
<li><a href="http://www.blogger.com/tom.staynalive.com">Contact</a></li>
</ul>
</div>
</div>
<div class="grid_12" id="feature">
Feature</div>
<div class="article grid_4">
Column One</div>
<div class="article grid_4">
Column Two</div>
<div class="article grid_4">
Column Three</div>
<div class="grid_12" id="bottom">
© Copyright 2013</div>
<style href="css/960_12_col.css" type="text/css">
#nav, #feature, .article, #bottom {
background-color: #efefef;
margin-top: 20px;
padding: 10px 0px 5px 0px;
font-family: Arial, Verdana, sans-serif;
color: #665544;
text-align: center;}
#feature, .article {
height: 100px;
font-family: Arial, Verdana, sans-serif;
color: #665544;
text-align: center;}
li {
display: inline;
padding: 5px;
font-family: Arial, Verdana, sans-serif;
color: #665544;
text-align: center;}
#top {
font-family: Arial, Verdana, sans-serif;
color: #665544;
text-align: center;}
</style>
I have a weird feeling... BABOOM!
Hi I'm a header
Hi I can be your table of contents side bar!
I'm the main page
Want to know how I did this? Well I'll tell you how.
It is by FLOATING!
Floating is a very useful tool to put things in the right order.
It can make your website look very pretty.
Logo
Feature
Column One
Column Two
Column Three
© Copyright 2013
<div class="container_12 clearfix">
<div class="grid_12" id="top">
<h1>
Logo</h1>
<div id="nav">
<ul>
<li><a href="http://www.blogger.com/tom.staynalive.com">Home</a></li>
<li><a href="http://www.blogger.com/tom.staynalive.com">Products</a></li>
<li><a href="http://www.blogger.com/tom.staynalive.com">Services</a></li>
<li><a href="http://www.blogger.com/tom.staynalive.com">About</a></li>
<li><a href="http://www.blogger.com/tom.staynalive.com">Contact</a></li>
</ul>
</div>
</div>
<div class="grid_12" id="feature">
Feature</div>
<div class="article grid_4">
Column One</div>
<div class="article grid_4">
Column Two</div>
<div class="article grid_4">
Column Three</div>
<div class="grid_12" id="bottom">
© Copyright 2013</div>
<style href="css/960_12_col.css" type="text/css">
#nav, #feature, .article, #bottom {
background-color: #efefef;
margin-top: 20px;
padding: 10px 0px 5px 0px;
font-family: Arial, Verdana, sans-serif;
color: #665544;
text-align: center;}
#feature, .article {
height: 100px;
font-family: Arial, Verdana, sans-serif;
color: #665544;
text-align: center;}
li {
display: inline;
padding: 5px;
font-family: Arial, Verdana, sans-serif;
color: #665544;
text-align: center;}
#top {
font-family: Arial, Verdana, sans-serif;
color: #665544;
text-align: center;}
</style>
Wednesday, March 27, 2013
Look at me mommy! I can swim in the summer but float in the spring!
I have a weird feeling... BABOOM!
Hi I'm a header
Hi I can be your table of contents side bar!
I'm the main page
Want to know how I did this? Well I'll tell you how.
It is by FLOATING!
Floating is a very useful tool to put things in the right order.
It can make your website look very pretty.
well here is the code:
<!DOCTYPE html>
<html>
<head>
<link type="text/css" rel="stylesheet" href="stylesheet.css"/>
<title>Result</title>
</head>
<body>
<div id="header"></div>
<div class="left"></div>
<div class="right"></div>
<div id="footer"></div>
</body>
</html>
<!DOCTYPE html>
<html>
<head>
<link type="text/css" rel="stylesheet" href="stylesheet.css"/>
<title>Result</title>
</head>
<body>
<div id="header"></div>
<div class="left"></div>
<div class="right"></div>
<div id="footer"></div>
</body>
</html>
Wednesday, March 13, 2013
Lot's of confusing words!!!!
Hey do you mind if you could go to this link here?
Thank you! That was a video I edited, filmed, and directed so please watch it, subscribe, like, and comment. Thank you, sincerely, Stayman a.k.a. The creator of this blog.
All right you may be tired of just putting in red or blue when it comes to colors. Never fear hexadecimals are here. You might be thinking "hexaWhatNow?" but do not worry they are not scary. here is a list of all of them also pseudo Class editors are fun for hovering over.
Here is the code:
<html>
<head>
<title>pretty colors</title>
<style type="text/css">
.over:hover{
color: #cc0000;
font-weight: bold;
text-decoration: none;
}
</style>
</head>
<body>
<a class="over" href="www.your link here.com">your text here</a>
</body>
</html>
the hexadecimal is the # with the numbers and letters. For example: #cc0000.
Wednesday, March 6, 2013
ID please, and and make it classy!
Halt! In the name of programming! Before you go on I may warn you that ID and classes are very helpful!
Hello my friends. Without class's and ID's We wouldn't be able to do awesome stuff like This and this and This. Well how do I do it you might say? Well, I'll show you.
here is the code:
<html>
<head>
<title>My class, My id</title>
<style type="text/css">
.red {
color: red
}
#id {
font-size: 45px;
color: blue
}
</style>
</head>
<body>
<h3 class="red">Your header here</h3>
<p class="red">Your paragraph here</p>
<p id="id">AWESOME</p>
</body>
</html>
Note: classes can have more than one HTML attribute, while id's can not.
Wednesday, February 27, 2013
Cascading Style Sheets, C.S.S. or, the more stylish machine of doom
Why hello!!!! We are going to learn C.S.S. today. I am so excited to show you this programming language, and the best part is: it can go along with html!!!!!! You know that one thing I was talking about in the comment section? You know the: "After this chapter is done we are going to do this again in a more fun way!!"? Well this is it!!! I will show you how to make it work!!!!
here is what we're doing:
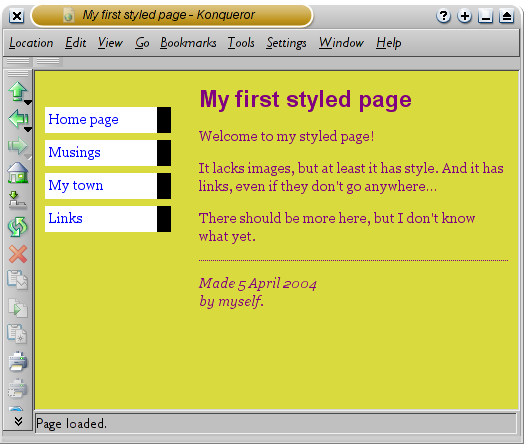
My first styled page
<!-- Site navigation menu
It lacks images, but at least it has style. And it has links, even if they don't go anywhere…
There should be more here, but I don't know what yet.
Made 5 April 2004
by myself.
-->
my editor does not like CSS. Well this is what we're making:
<html>
<head>
<title>CSS (finally)</title>
<style type="text/css">
p {
color: purple;
background-color: green }
</style>
</head>
<body>
<p>Your awesome text here</p>
</body>
</html>
sorry for throwing this at you for no reason I am just so exited
now save it. window, save as, and call it: css.HTML
here is what we're doing:
My first styled page
Welcome to my styled page!It lacks images, but at least it has style. And it has links, even if they don't go anywhere…
There should be more here, but I don't know what yet.
Made 5 April 2004
by myself.
-->
my editor does not like CSS. Well this is what we're making:
Lesson 1: CSS new lesson
<html>
<head>
<title>CSS (finally)</title>
<style type="text/css">
p {
color: purple;
background-color: green }
</style>
</head>
<body>
<p>Your awesome text here</p>
</body>
</html>
sorry for throwing this at you for no reason I am just so exited
now save it. window, save as, and call it: css.HTML
Thursday, February 21, 2013
Carpe Diem, Español, 你好,I dub thee, Sir Thomas, Hello, I speak in accents!!!
Hello my fellow followers! it has been a long time since I have talked to you in public. Now before I go and tell you how to do this, I want a few words: To be powerful, Or not to be powerful, that is the question.
I have had a peace treaty with the C.S.S. and we will be learning its language soon.
I would recommend you write this down:
<html>
<head>
<title>With Great Power Comes Great Responsibility</title>
</head>
<body>
<p style="font-family: Garamond(The thing that I am speaking in)">Your voice here</p>
</body>
</html>
You may want to speak like me, but I think you want to speak in your own way. Here is all of the different type of voices you can use. (Not all voices you may see, some have masks on them).
Monday, February 4, 2013
How Google Makes Their Jokes
Hey it's me again. I am going of topic with programming, but Google is a lot better than programming. The reason why is because of how funny they can be. It's more than just a search bar, it's Google.
Here is some fun things you can do with Google:
That's it I'm done. I said I'm done! You can go now. Shoo! Shoo! Stop reading this page! Fine, if you want amusement I'll give you amusement!
Here is some fun things you can do with Google:
- This is probably the most easy thing to do with Google, open Google and hover over the "I'm Feeling Lucky" button, without typing anything in, and it will spin to many different things including
- I am feeling hungry
- I am feeling playful
- I am feeling artistic
- I am feeling wonderful
- I am feeling stellar
- I am feeling puzzled
- In the search bar type in anagram and Google will ask you did you mean nag a ram?
- A more common one is the barrel roll. so type in the search bar do a barrel roll and the screen will spin!
- type recursion in the search bar and it will ask you did you mean recursion? Well, at first I did not know what that meant, but eventually I looked in the dictionary and it means repeating its self.
- Two words my friend, Zerg Rush. Type that in to the search bar and good luck! your going to need it. Zerg Rush is a game that you have to destroy the thingys to win before they get you!!!
- type in google gravity and click I am Feeling Lucky, That's it
- type in google Chuck Norris, Oops I shouldn't say that, anyways click on the I'm Feeling lucky button and read ALL OF IT!!!
That's it I'm done. I said I'm done! You can go now. Shoo! Shoo! Stop reading this page! Fine, if you want amusement I'll give you amusement!
Wednesday, January 30, 2013
I'm to young to dive in a colored pit, instead how about I swim on top of it!
Hello fellow citizens, I am to young to di*cough*, I mean, I am surrounded by this weird red substance. I am trying to decode it but it wont budge.
Huh? What happend? I am back to normal, or almost normal.
Oh there we go. Can I get your attention? Can I get a microphone or something? Thank you!
Huh? What happend? I am back to normal, or almost normal.
Oh there we go. Can I get your attention? Can I get a microphone or something? Thank you!
Whoa! To loud, h4 can I get your help?
Thank you! So now that I have decoded it, I am almost back to normal, the only thing is, I have a microphone and I am orange. What? You want the code? ok.
here is the code:
<html>
<head>
<title>color twice</title>
</head>
<body>
<p style="background-color: your background color here">your text here</p>
</body>
</html>
If you can't think of any color do orange, red or blue
Thursday, January 17, 2013
I can write now but where are my colored pencils?
In the last lesson we changed the font size. Today we are going to change the color of the font. This is what it should look like:
Ok here is how to make something like that.
<DOCTYPE! html>
<html>
<head>
<title>stylish</title>
</head>
<body>
<h3 style="color: red">Awesome<h3>
</body>
</html>
Awesome
Ok here is how to make something like that.
<DOCTYPE! html>
<html>
<head>
<title>stylish</title>
</head>
<body>
<h3 style="color: red">Awesome<h3>
</body>
</html>
THE
END
Wednesday, January 9, 2013
lego mindstorms
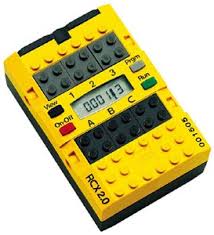
The very first version of lego mindstorms was the lego mindstorms rcx I don't know anything about but it has a little screen. The one good thing about it is that it has studs.
 The next thing I want to talk about is the second generation of LEGO MINDSTORMS or LEGO Mindstorms NXT. It brought a whole new way of looking at Mindstorms. It had a bigger screen, it had better buttons it looked cooler but it did not have studs. It also has the sound sensor, supersonic sensor, touch sensor, and motors.

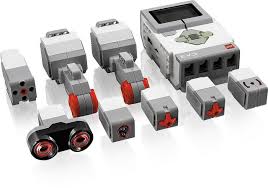
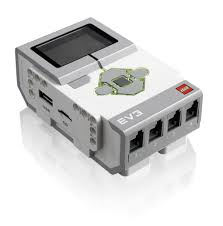
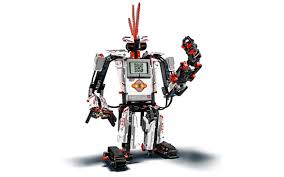 The last one is the EV3, the best one yet. I love how it is red and box like. It has a medium motor with two regular motors, a remote control, a rotation thingy(I don't know what that is yet), and a new mindstorms brick look.
The next lego mindstorms is lego mindstorms nxt 2.0( The one I got for Christmas). When it first came out they made a special version of it. They made the whole thing black. What is different between the two NXTs one has more bricks, it has three motors(the other one only had two), two touch sensors and a light sensor. It does not have a sound sensor like the other one.
Project: LEGO Upgrade
Thursday, January 3, 2013
To be cool and awesome you need style
So we have seen header but what if we wanted to make words a certain size or color. We use the "style" setting(one of the things that go into stuff like: <p>).
Over the few lessons we'll be going to make this:
Cool right!! I used a div tag, but you don't need one.
So open up your notepad or codecademy and type:
<html>
<head>
<title>STYLE : )</title>
</head>
<p style ="font-size: 45px">your text here</p>
</html>
The output should look like this:
now save it. window, save as, and call it: style.HTML
I encourage you to play around with the pixels(px) also known as the number in the box(45) for people that are not as high-tech.
Over the few lessons we'll be going to make this:
I am 45 pixels, color green, I am styled Garamond and my back ground color is orange. I am awesome.
Cool right!! I used a div tag, but you don't need one.
Lesson 1: Size with style
So open up your notepad or codecademy and type:
<html>
<head>
<title>STYLE : )</title>
</head>
<p style ="font-size: 45px">your text here</p>
</html>
The output should look like this:
AWESOME!!!
now save it. window, save as, and call it: style.HTML
I encourage you to play around with the pixels(px) also known as the number in the box(45) for people that are not as high-tech.
Wednesday, December 19, 2012
The copying, typing and teleporting machine of death
Hurry, Hurry, Hurry folks watch you tame the computer. Learn to tame Videos and Video games. I have a youtube account now so be sure to watch the blog playlist.
Anywhoo we are going to make:
how to do this is:
<html>
<head>
<title>embed</title>
</head>
<body>
find a youtube video, click share, click embed,copy that then paste it hear.
here is a harder thing, find a game, click share, click embed,copy that then paste it hear.
</body>
</html>
well you know what to do.
Thursday, December 13, 2012
Teleportation, on my computer?Whoa, when did that get there?
Today I will be showing some of my favorite things to do in HTML.
This is what we are doing:

This is my website
This is how we will do it.
type:
<DOCTYPE!html>
<html>
<head>
<title>links and pictures</title>
</head>
<body>
<img src=" Your image here" />
<p>Your text <a href="your website here">here<a></p>
</body>
</html>
Thats how you do it. Name it anything you want as long as you put .HTML at the end.
I f you cant think of any pictures or links to put in there, put this picture of han solo on. And for the "your website here" part put: "http://tom.staynalive.com/2012/12/teleportation-on-my-computerwow-when.html"
you can also link images like this:

Here is the code:
<a href="http://tom.staynalive.com/2012/12/teleportation-on-my-computerwow-when.html"><img src="http://www.beertripper.com/OffTopic/star_wars_images/Leia_2/Princess_Leia_Organa_Large_Blaster_Pose.jpg" /></a>
just put it right where the picture goes. To open from notepad just go to files>notepad>your text here.html>
This is what we are doing:
This is my website
This is how we will do it.
type:
<DOCTYPE!html>
<html>
<head>
<title>links and pictures</title>
</head>
<body>
<img src=" Your image here" />
<p>Your text <a href="your website here">here<a></p>
</body>
</html>
Thats how you do it. Name it anything you want as long as you put .HTML at the end.
I f you cant think of any pictures or links to put in there, put this picture of han solo on. And for the "your website here" part put: "http://tom.staynalive.com/2012/12/teleportation-on-my-computerwow-when.html"
you can also link images like this:
Here is the code:
<a href="http://tom.staynalive.com/2012/12/teleportation-on-my-computerwow-when.html"><img src="http://www.beertripper.com/OffTopic/star_wars_images/Leia_2/Princess_Leia_Organa_Large_Blaster_Pose.jpg" /></a>
just put it right where the picture goes. To open from notepad just go to files>notepad>your text here.html>
Wednesday, December 5, 2012
Commandos of the html world: titles and headings
Today I will show you how to make the bases of the company! I mean HTML. : (
The bases of HTML are: headings and titles
Let me put it this way:
The title = Boss
<h1> = second in command
<h2> = tester
<h3> = janitor
<h4> = worker
<h5> = intern
<h6> = coffee server
The <h>'s stands for heading. As you saw in order who controls what. Well headers are basically just paragraphs, but they put them in a certain size.
Well here is the code:
<DOCTYPE! html>
<html>
<head>
<title>Type your title here</title>
</head>
<body>
<h1>Type your text here</h1>
<p> Type your paragraph here</p>
</body>
</html>
You can use a <h1> through <h6> on any of them. You can also add more than one out. I in courage you to try all of them. I am sorry, the last time I told you to save as... then I cut you off. Oh I am so very sorry I cut you off and it will never happen again. Well any ways for note pad click save as... then type Header.html (sort of like .py in python) and for codecademy hit "run"
Tuesday, November 27, 2012
HTML: I have dived into a paragraph and I couldn't get out, until now
Sorry I've haven't typed for so long. First I thought I would wait until I had 10,000 viewers. But then I stopped looking at my blog. Now I am going to teach HTML. If you've been to my HTML5 lesson, it's kind of like that.
This is Luke Skywalker.
If you have a windows computer, open the notepad, If not go to codecademy, Web fundamentals, the first course. Alright, I think I can start you off.
Today you are going to learn haw to make this:
Luke Skywalker
This is Luke Skywalker.
If you have a windows computer, open the notepad, If not go to codecademy, Web fundamentals, the first course. Alright, I think I can start you off.
Lesson 1: Paragraphs
To make the website say what you want it to say, we use the tags <p>,</p> and <br>,</br>.
Lets worry about<p> and </p> first.
Type:
<!DOCTYPE html>
<html>
<head>
</head>
<body>
<p>Type anything here</p>
</body>
</html>
alright, if you are using codecademy hit run. If you are using notepad hit save as....
There will be 5 Lessons(counting this one).
Lets worry about<p> and </p> first.
Type:
<!DOCTYPE html>
<html>
<head>
</head>
<body>
<p>Type anything here</p>
</body>
</html>
alright, if you are using codecademy hit run. If you are using notepad hit save as....
There will be 5 Lessons(counting this one).
Wednesday, May 2, 2012
NXT Mindstorms Lego Class at Legoland
If you go to Legoland, be sure to visit the NXT mindstorms lego class. Sign up outside the Einstein statue early in the morning before classes fill up (ages 10+). There are two versions of the class-Mars or the Human Body. I did the Human Body class.
Each kid was given a robot, a computer, and other lego accessories. The first thing you had to do was program you NXT robot to use its color sensor so it can navigate the red veins of the human body model. Next, you program your robot to pick up blue blood cells using a fork lift. Then you switch the fork lift accessory for a saw accessory. Next, you program your robot to cut a "bad" blue vein using the saw attachment. Time for another accessory change to a ball holder. Your mission is to take 4 medicine balls to the heart and drop them into the right spot. After successfully programming it to drop balls, you then program it to launch balls. We ran out of time before I got to launch my ball at the target.
The class lasted about an hour. I do want to do the class again but I would like to try the Mars missions.
Programming the robot was tricky because you had to measure the distances and put in all the right and left turns.
 Other places offer NXT Lego Mindstorm classes including many rec centers. You can also buy the kit and practice at home.
Each kid was given a robot, a computer, and other lego accessories. The first thing you had to do was program you NXT robot to use its color sensor so it can navigate the red veins of the human body model. Next, you program your robot to pick up blue blood cells using a fork lift. Then you switch the fork lift accessory for a saw accessory. Next, you program your robot to cut a "bad" blue vein using the saw attachment. Time for another accessory change to a ball holder. Your mission is to take 4 medicine balls to the heart and drop them into the right spot. After successfully programming it to drop balls, you then program it to launch balls. We ran out of time before I got to launch my ball at the target.
The class lasted about an hour. I do want to do the class again but I would like to try the Mars missions.
Programming the robot was tricky because you had to measure the distances and put in all the right and left turns.

Tuesday, April 10, 2012
Codecademey!!!
I have been learning javascript recently and this website's first lesson is javascript. Type in the website box : codecademy.com or just click here. Well, after that sign up, click getting started with programing. Follow the steps it takes you through. If for some reason it's blocked or it is not working tell me in the comments.
Tuesday, April 3, 2012
HTML 5
After today's lesson you will be able to do this.
go ahead type your first name, last name and a comment(your the only one that can see it though.)
This is a new unit called HTML 5. It is a combination between HTML and javascript
First we need the program to run HTML 5.click to download the program, Komodo. OPEN IT!!!
Type:
<html>
<head>
<title> My Form</title>
<script>
function loadForm(e) {
var my_output = document.getElementById("say_hi");
var first_name_object = document.getElementById("first_name");
var last_name_object = document.getElementById("last_name");
var boom = document.getElementById("boom");
my_output.innerHTML = first_name_object.value + " " + last_name_object.value + "
</br>" + "
</br>" + boom.value;
}
function deleteForm(e) {
var first_name_object = document.getElementById('first_name');
first_name_object.value = "";
var last_name_object = document.getElementById('last_name');
last_name_object.value = "";
var boom = document.getElementById('boom');
boom.value = "";
}
</script>
</head>
<body>
<form id="toms_form">
<fieldset>
<label for="first_name">First Name: </label><input id="first_name" type="text" />
<label for="last_name">Last Name: </label><input id="last_name" type="text" />
<div>
<label for="boom">Comments </label><textarea cols="40" id="boom" placeholder="Enter your comments here..." rows="5"></textarea></div>
<div>
<input id="submit_button" onclick="loadForm(); false;" type="button" value="Submit" /></div>
<div>
<input id="reset_button" onclick="deleteForm(); false;" type="button" value="Reset" /></div>
</fieldset>
</form>
<output id="say_hi">
</output>
</body>
</html>
At the top(make sure your not running any websites but Komodo) click the blue earth, click what you want it to run on(ex. google chrome), and hit run.Try it out. I like it.
Saturday, February 25, 2012
star wars 3D surprise
something space related.
This is also off of my hello world book.
Type this:
This is also off of my hello world book.
Type this:
import pygame, sys
from math import *
pygame.init()
#wider screen than LunarLander, since we have sideways motion
screen = pygame.display.set_mode([800,600])
screen.fill([0, 0, 0])
ground  = 540   #landing pad is ay y = 540
start = 90      # starting location 90 pixels from top of window
clock = pygame.time.Clock()
ship_mass = 5000.0
fuel = 5000.0
fps = 30  #default
x_loc = 20  # x-location in meters = dist from center of landing pad
y_loc = 40  # y-location in meters = height above the landing pad

x_offset = 40    # offsets so that when ship location is (0,0), ship is
y_offset = -108  #   just touching landing pad, and centered.

x_speed = 2000.0   #pixels/frame
y_speed = -800.0

x_velocity = x_speed/(10.0*fps)  #m/s
y_velocity = y_speed/(10.0*fps)

gravity = 1.5
thrust = 0
delta_v = 0
scale = 10   #scale factor from pixels to meters
throttle_down = False
left_down = False
right_down = False
#held_down = False
count = 0
x_pos = 0
y_pos = 0

"""
x_pos, y_pos in pixels - (0,0) is top left
x_loc, y_loc in meters - (0,0) is center of landing pad

x_speed, y_speed in pixels per frame.
x_velocity, y_velocity in m/s

scale factor = 10  (10 pixels = 1 meter)

pos (pixels) to loc (meters) is scaled by: scaleFactor (meters/pixel)
speed (pixels/frame) to velocity (m/s) is scaled by:
ScaleFactor * FPS (Frames Per Second)

"""


# sprite for the ship
class ShipClass(pygame.sprite.Sprite):
  def __init__(self, image_file, position):

      pygame.sprite.Sprite.__init__(self)
      self.imageMaster = pygame.image.load(image_file)
      self.image = self.imageMaster
      self.rect = self.image.get_rect()
      self.position = position
      self.rect.centerx, self.rect.centery = self.position
      self.angle = 0

  def update(self):
      self.rect.centerx, self.rect.centery = self.position
      oldCenter = self.rect.center
      self.image = pygame.transform.rotate(self.imageMaster, self.angle)
      self.rect = self.image.get_rect()
      self.rect.center = oldCenter
Tuesday, February 14, 2012
Valentine surprise
heres some more games for python.
It's not valentine related but it is old-school.
type this:
It's not valentine related but it is old-school.
type this:
import pygame, sys, math, random
from pygame.locals import *

pygame.init()

# Definerer farger
BLACK = (0,0,0)
WHITE = (255,255,255)
RED = (255,0,0)
GREEN = (0,255,0)
BLUE = (0,0,255)

def main():

    # Initialisere settings og klokke
    clock = pygame.time.Clock()
    settings = {};
    settings['show_framerate'] = False
    settings['framerate'] = 60
    settings['screen_size'] = settings['width'], settings['height'] = (640, 480)
    settings['currentframerate'] = settings['framerate']

    settings['paused'] = False
    settings['players'] = pygame.sprite.Group()
    settings['balls'] = pygame.sprite.Group()
    settings['player1'] = Player('Spiller 1', [50, settings['height'] /2], settings['screen_size'], WHITE)
    settings['player1_score'] = 0
    settings['player1_up'] = K_w
    settings['player1_down'] = K_s
    settings['player2'] = Player('Spiller 2', [settings['width']-50, settings['height'] /2], settings['screen_size'], WHITE)
    settings['player2_score'] = 0
    settings['player2_up'] = K_UP
    settings['player2_down'] = K_DOWN
    settings['score_changed'] = True
    settings['players'].add(settings['player1'], settings['player2'])
    settings['balls'].add(Ball([settings['width']/2, settings['height']/2], settings['screen_size']))

    font = pygame.font.Font('arial', 30)
    fpstext = font.render("FPS: "+ str(settings['currentframerate']), 1, WHITE)
    fpstextpos = fpstext.get_rect()

    # Initialiserer skjerm
    screen = pygame.display.set_mode(settings['screen_size'], FULLSCREEN, 32)
    pygame.display.set_caption("Ping v0.1")
    random.seed()
    pygame.mouse.set_visible(False)

    # Gameloop
    while True:
        start_tick = pygame.time.get_ticks()
        for event in pygame.event.get():
            if event.type == QUIT:
                sys.exit()
            elif event.type == KEYDOWN:
                if event.key == K_ESCAPE:
                    sys.exit()
                elif event.key == K_f:
                    settings['show_framerate'] = not settings['show_framerate']
                elif event.key == K_p:
                    settings['paused'] = not settings['paused']
                elif event.key == K_a:
                    settings['balls'].add(settings['balls'].sprites()[0].maketwin())
                elif event.key == K_1:
                    settings['player1'].modify_size(2)
                elif event.key == K_2:
                    settings['player2'].modify_size(0.5)
                elif event.key == K_3:
                    settings['player1'].modify_speed(10)
                elif event.key == K_4:
                    settings['player2'].modify_speed(1)
                elif event.key == K_5:
                    settings['balls'].sprites()[0].set_speed(2)
                elif event.key == K_6:
                    settings['balls'].sprites()[0].set_speed(10)
                elif event.key == K_q:
                    settings['player1'].modify_speed(5)
                    settings['player2'].modify_speed(5)
                    settings['player1'].modify_size(1)
                    settings['player2'].modify_size(1)
                    settings['balls'].sprites()[0].set_speed(5)

        if not settings['paused']:
            # Checking input
            keys = pygame.key.get_pressed()
            if keys[settings['player1_up']]:
                settings['player1'].moveup()
            if keys[settings['player1_down']]:
                settings['player1'].movedown()
            if keys[settings['player2_up']]:
                settings['player2'].moveup()
            if keys[settings['player2_down']]:
                settings['player2'].movedown()

            # Moving ball(s)
            settings['balls'].update()
            # Fjerner baller som gaar utenfor skjermen
            for ball in settings['balls'].sprites():
                if ball.rect.left < 0:
                    settings['player2_score'] += 1
                    settings['balls'].remove(ball)
                    settings['score_changed'] = True
                elif ball.rect.right > settings['width']:
                    settings['player1_score'] += 1
                    settings['balls'].remove(ball)
                    settings['score_changed'] = True
            # Legger til en ny ball om det finnes 0 baller paa brettet
            if not bool(settings['balls']):
                settings['balls'].add(Ball([settings['width']/2, settings['height']/2], settings['screen_size']))

            # Sjekker kollisjoner
            ball_player_collisions = pygame.sprite.groupcollide(settings['balls'] ,settings['players'], False, False)
            for ball in ball_player_collisions.iterkeys():
                ball.crash(ball_player_collisions[ball])
        else:
            pausetext = font.render("Pause", 1, WHITE)
            pausetext_rect = pausetext.get_rect()
            pausetext_rect = pausetext_rect.move((settings['width'] - pausetext_rect.width) / 2 , (settings['height'] - pausetext_rect.height) / 2)

        # Tegner opp skjermbildet
        screen.fill(BLACK)
        if settings['show_framerate']:
            fpstext = font.render("FPS: "+ str(int(clock.get_fps())), 1, WHITE)
            screen.blit(fpstext, fpstextpos)

        if settings['paused']:
            screen.blit(pausetext, pausetext_rect)

        if settings['score_changed']:
            p1text = font.render("Player 1: "+ str(settings['player1_score']) + " poeng", 1, WHITE)
            p1text_rect = p1text.get_rect()
            p1text_rect = p1text_rect.move(5, settings['height'] - p1text_rect.height - 5)
            p2text = font.render("Player 2: "+ str(settings['player2_score']) + " poeng", 1, WHITE)
            p2text_rect = p2text.get_rect()
            p2text_rect = p2text_rect.move(settings['width'] - p2text_rect.width - 5, settings['height'] - p2text_rect.height - 5)
            settings['score_changed'] = False

        screen.blit(p1text, p1text_rect)
        screen.blit(p2text, p2text_rect)
        settings['players'].draw(screen)
        settings['balls'].draw(screen)
        for ball in settings['balls']:
            ball.render(screen)
        pygame.display.update()

        # Adjusting framerate
        time = (1000/settings['framerate']) - pygame.time.get_ticks() + start_tick
        clock.tick()
        if time > 0:
            pygame.time.wait(time)

class Ball(pygame.sprite.Sprite):

    def __init__(self, position, screensize, color = WHITE):
        pygame.sprite.Sprite.__init__(self)
        self.color = color
        self.speed = 5
        if random.random() < 0.5:
            temp = -1.0
        else:
            temp = 1.0
        if random.random() < 0.5:
            temp2 = -1.0
        else:
            temp2 = 1.0
        self.vector = Vector2(temp*random.randint(10,30), temp2*random.randint(10,20))
        self.vector.normalize()
        self.screensize = screensize

        self.image = pygame.Surface((10,10))
        self.image.fill(BLACK)
        self.image.set_colorkey(BLACK)
        pygame.draw.circle(self.image, self.color, (5,5), 5)
        self.rect = self.image.get_rect()
        self.rect = self.rect.move(position[0], position[1])

    def render(self, screen):
        screen.blit(self.image, self.rect)

    def crash(self, players):
        self.vector = Vector2(-self.vector.x, self.vector.y)
        for player in players:
            left = abs(player.rect.left - self.rect.right)
            right = abs(player.rect.right - self.rect.left)
            top = abs(player.rect.top - self.rect.bottom)
            bottom = abs(player.rect.bottom - self.rect.top)
            if left == min(left, right, top, bottom):
                self.vector = Vector2(-abs(self.vector.x), self.vector.y)
            elif right == min(left, right, top, bottom):
                self.vector = Vector2(abs(self.vector.x), self.vector.y)
            elif top == min(left, right, top, bottom):
                self.vector = Vector2(self.vector.x, -abs(self.vector.y))
            elif bottom == min(left, right, top, bottom):
                self.vector = Vector2(self.vector.x, abs(self.vector.y))

    def update(self):
        self.rect = self.rect.move(self.vector.x * self.speed, self.vector.y * self.speed)
        if self.rect.top < 0 or self.rect.bottom > self.screensize[1]:
            self.vector = Vector2(self.vector.x, -self.vector.y)

    def set_speed(self, new_speed):
        self.speed = new_speed

    def maketwin(self):
        twin = Ball([self.rect.left, self.rect.top], self.screensize)
        twin.vector = Vector2(self.vector.x, -self.vector.y)
        twin.speed = self.speed
        return twin

class World(object):

    def __init__(self, p1, p2):
        self.players = (p1, p2)

class Player(pygame.sprite.Sprite):

    def __init__(self, name, position, screensize, color = (255,0,0)):
        pygame.sprite.Sprite.__init__(self)
        self.speed = 5
        self.name = name
        self.size = [20,100]
        self.color = color
        self.screensize = screensize

        self.image = pygame.Surface((20,100))
        self.image.fill(self.color)
        self.rect = self.image.get_rect()
        self.rect = self.rect.move(position[0]-self.size[0]/2, position[1]-self.size[1]/2)

    def render(self, screen):
        screen.blit(self.image, self.rect)

    def moveup(self):
        if (self.rect.top > 0):
            self.rect = self.rect.move(0,-self.speed)

    def movedown(self):
        if (self.rect.bottom < self.screensize[1]):
            self.rect = self.rect.move(0,self.speed)

    def modify_speed(self, speed):
        self.speed = speed

    def modify_size(self, size):
        self.rect = Rect(self.rect.left, self.rect.top-((self.size[1]*size-self.rect.height)/2), self.size[0], self.size[1]*size)
        self.image = pygame.transform.scale(self.image, (self.size[0], int(size*self.size[1])))

class Vector2(object):

    def __init__(self, x, y):
        self.x = x
        self.y = y

    def __add__(self, o):
        return Vector2(self.x + o.x, self.y + o.y)

    def __sub__(self, o):
        return Vector2(self.x - o.x, self.y - o.y)

    def __neg__(self):
        return Vector2(-self.x, -self.y)

    def __mul__(self, s):
        return Vector2(self.x * s, self.y * s)

    def __div__(self, s):
        return Vector2(self.x / s, self.y / s)

    def __str__(self):
        return "Vector2 (%s, %s)"%(self.x, self.y)

    def length(self):
        return math.sqrt((self.x**2 + self.y**2))

    def normalize(self):
        l = self.length()
        self.x /= l
        self.y /= l

    @classmethod
    def from_points(cls, P1, P2):
        return cls(P2[0]-P1[0], P2[1]-P1[1])

if __name__ == '__main__': main()
Wednesday, February 1, 2012
game cheats
I'm going to show you some computer game cheats for kids. Right now I am going to show you poptropica and club penguin. Club penguin only has one that I know of.
Go to the map and there should be an ice island on the far right -->

<---follow the arrow
now the poptropica cheats. Most are pc cheats/all computers except mac, and all computers.
pc cheats: all computers:
control+shift+o Finish the nabooti island and go to items and click on the phone.
control+shift+p dial 1337
control+shift+f5 411
jump and press control+shift+f6 911
1225
if you want more ask in comments.
Sunday, December 11, 2011

Christmas time!!!!
Instead of me going on and on about programing I am going to show you how to make a christmas games that are fun.
Here is a yummy Christmas recipe.
Open your python window, open a new window on python and type this:
import pygame
running=True
screen=pygame.display.set_mode([600,700])
pygame.display.set_caption("Gingerbread Decorator")
help=pygame.image.load("resources/buttons/help.png")
screen.fill([255,255,255])
back=pygame.image.load("resources/buttons/back.png")
bread=pygame.image.load("resources/gingerbread.png")
frostin=pygame.image.load("resources/buttons/frost.png")
map=pygame.image.load("resources/map.png")
bites=[pygame.image.load("resources/buttons/bite_1.png"), pygame.image.load("resources/buttons/bite_2.png"),pygame.image.load("resources/buttons/bite_3.png"), pygame.image.load("resources/buttons/bite_4.png"),pygame.image.load("resources/buttons/bite_5.png"), pygame.image.load("resources/buttons/back.png"),]
candies_im={"red":pygame.image.load("resources/red.png"), "green":pygame.image.load("resources/buttons/gumgreen.png")}
buttons=[pygame.image.load("resources/buttons/clear.png"),pygame.image.load("resources/buttons/icing.png"),pygame.image.load("resources/buttons/red.png"),pygame.image.load("resources/buttons/gum.png"),pygame.image.load("resources/buttons/red_line.png"), pygame.image.load("resources/buttons/mouth.png")]
old_pos=[0,0]
clock=pygame.time.Clock()
temp_line=[]
frosting_dots=[]
lines=[]
candies=[]
#candy_struc=["type", [loc_x, loc_y]]
mouse_down=False
adding=""
state="add"
while running:
for event in pygame.event.get():
if event.type == pygame.QUIT:
running=False
if event.type == pygame.MOUSEBUTTONDOWN:
mouse_down=True
if pygame.mouse.get_pos()[1]<601: if map.get_at(pygame.mouse.get_pos())==(0,0,0, 255): if adding == "red": candies.append(["red", pygame.mouse.get_pos()]) if adding == "green": candies.append(["green", pygame.mouse.get_pos()]) if event.type == pygame.MOUSEBUTTONUP: mouse_down=False if adding=="line": lines.append(temp_line) temp_line=[] if mouse_down: if pygame.mouse.get_pos()[1]<601: if adding=="frost": #print map.get_at(pygame.mouse.get_pos()) if map.get_at(pygame.mouse.get_pos())==(0,0,0, 255): frosting_dots.append(pygame.mouse.get_pos()) if adding=="line": if map.get_at(pygame.mouse.get_pos())==(0,0,0, 255): temp_line.append(pygame.mouse.get_pos()) #if adding=="red": # candies.append(["red", pygame.mouse.get_pos()]) else: if pygame.mouse.get_pos()[0]>50 and pygame.mouse.get_pos()[0]<125 and pygame.mouse.get_pos()[1]>613 and pygame.mouse.get_pos()[1]<688: #clear frosting_dots=[] candies=[] lines=[] if pygame.mouse.get_pos()[0]>140 and pygame.mouse.get_pos()[0]<215 and pygame.mouse.get_pos()[1]>613 and pygame.mouse.get_pos()[1]<688: adding="frost" print "frost" if pygame.mouse.get_pos()[0]>230 and pygame.mouse.get_pos()[0]<305 and pygame.mouse.get_pos()[1]>613 and pygame.mouse.get_pos()[1]<688: adding="red" print "red" if pygame.mouse.get_pos()[0]>320 and pygame.mouse.get_pos()[0]<395 and pygame.mouse.get_pos()[1]>613 and pygame.mouse.get_pos()[1]<688: adding="green" print "green" if pygame.mouse.get_pos()[0]>410 and pygame.mouse.get_pos()[0]<485 and pygame.mouse.get_pos()[1]>613 and pygame.mouse.get_pos()[1]<688: adding="line" if pygame.mouse.get_pos()[0]>500 and pygame.mouse.get_pos()[0]<575 and pygame.mouse.get_pos()[1]>613 and pygame.mouse.get_pos()[1]<688: state="eat" #screen.fill([255,255,0]) screen.blit(back, [0,0]) screen.blit(bread, [0,0]) for dot in frosting_dots: #screen.blit(frosting, [dot[0]-7, dot[1]-7]) pygame.draw.circle(screen, [240,240,240], dot, 8, 0) #try: # pygame.draw.lines(screen, [240,240,240],False, frosting_dots, 10) #except: # pass for candy in candies: screen.blit(candies_im[candy[0]], [candy[1][0]-25, candy[1][1]-25]) for line in lines: try: pygame.draw.lines(screen, [255,0,0], False, line, 5) except: pass try: pygame.draw.lines(screen, [255,0,0], False, temp_line, 5) except: pass for i in range(0,len(buttons)): screen.blit(buttons[i], [i*90+50, 612]) if adding=="": screen.blit(help, [0,0]) if state=="eat": for bite in bites: screen.blit(bite, [0,0]) for i in range(0,len(buttons)): screen.blit(buttons[i], [i*90+50, 612]) if adding=="": screen.blit(help, [0,0]) pygame.display.flip() pygame.time.delay(500) candies=[] lines=[] frosting_dots=[] state="add" pygame.display.flip() clock.tick(60)
name it gingerbread.py
if you have any trouble running it tell me in the comment box. Happy Holidays everyone!!!!
Subscribe to:
Posts (Atom)